Proxmox-NUT Homelab HOWTO - Step 7 : Setup Backup Endpoints / Backup / Restore
Introduction
In Step 7 of our Proxmox-NUT Homelab HowTo series, we will cover the topic of backups, specifically focusing on backing up your virtual machines (VMs). If you prefer a visual tutorial, you can watch the video below.
This series includes a torrent file that allows you to follow along. The torrent file contains VMware snapshots for each step in the series. You need VMware Workstation, which is now free for personal use. The link to the torrent file is available here. Once you extract the torrent and open it in VMware, select Step 7 snapshot.
If you’ve just discovered this series and would like to review the earlier steps, please visit: https://www.alanbonnici.com/2024/08/proxmox-nut-homelab-howto-step-0.html.
What is covered
In this HowTo, we will back up to two endpoints:
- A USB device plugged directly into the Proxmox server, which is assumed to be entirely dedicated to Proxmox.
- A network share.
No backup strategy is complete unless it has been verified. Therefore, we will also discuss the restore process.
Since the actual backup/restore process does not change depending on the endpoint, we will focus on USB backup; what applies here will also apply to the network share.
Setting Up a USB Backup Endpoint
- Plug your USB device into your Proxmox server. Since Proxmox is installed on VMware, you need to attach the device to Proxmox.
- Proxmox will detect the device, which you can view by selecting PVE Node → Disks. Click on the disk and press Wipe Disk. This action will erase the disk. Click Yes to start the process.
- After wiping the disk, press Initialize Disk with GPT to create the disk partition. After selecting the disk, you need to specify the file system (ext4 commonly used in Linux-based operating systems) and the name of this partition. This name will be used to reference the disk and can be seen by selecting PVE Node → Disks → Directory.
Defining the Backup Job
Select Datacenter → Backup. Press the button Add.
In the dialogue box that appears, specify the following:
General Tab
- Node: Since this HowTo has only one node (pve1), you can keep the default.
- Storage: This is your endpoint. Chose it from the dropdown list.
- Schedule: This defines when backups will occur; details are covered under Backup Schedule.
- Selection mode: Specify which VMs to include with options such as Include / Exclude Selected VMs, All VMs, or Pool based.
- Notification mode: What system should be used to notify you.
- Send email to: The email address for forwarding backup run information (if using the PNHH VM, adjust the SMTP server settings accordingly).
- Send email: Specify whether emails should be sent always or only in case of errors.
- Compression: Select your preferred compression type.
- Mode: Determine how the backup process handles running VMs with three options:
- Snapshot: A snapshot of the VM is taken while it remains available; changes are written to a separate file during backup. This mode provides the lowest operation downtime, at the cost of a small inconsistency risk.
- Stop: The VM is stopped for backup and restarted afterward; this provides high consistency but makes it unavailable during backup.
- Suspend: (from https://pve.proxmox.com/pve-docs/pve-admin-guide.html#_backup_modes) "This mode is provided for compatibility reason, and suspends the VM before calling the snapshot mode ... results in a longer downtime and does not necessarily improve the data consistency, the use of the snapshot mode is recommended instead."
- Enable: Self-explanatory.
- Job Comment: Add any relevant comments.
Retention Tab
Define how many backups to keep by selecting options such as Day, Month, Year, Week, Hour, or based on a specific number of backups. In a homelab context, you might primarily focus on recency by setting only the Keep Last parameter. Organizations may have different requirements based on operational and compliance needs. You should aim to have more than one backup.
Note Template Tab
Specify a template for generating backup notes using variables that are replaced with machine details during backup.
You can also Edit and Delete backup jobs and view their details. There is an option to perform a manual backup as well.
During a backup operation, progress information is shown in Tasks and remains accessible after completion.
Deleting a VM
In this HowTo, we will delete and then restore a VM. However, this method is not recommended for testing a backup strategy since if the backup fails, you could lose your VM. A backup may fail for various reasons unrelated to its functionality; for instance, if the backup media is damaged or unreliable.
The proper way to test a backup is by restoring it on another machine to ensure both functionality and compatibility across hardware. If you do not have another Proxmox installation available, you can restore the VM to a separate instance (more information under Restore).
Note: the reasons I took this approach in this HowTo are that I wanted to include the delete process in the narrative and I did not want to increase the overall size of the VMWare torrent. Additionally, I have snapshots and backups of the VMware platform that I could revert to.
- Select the VM you wish to delete.
- Click More → Remove.
- (Optional) Check the box to remove references of this VM in Proxmox jobs (e.g., backup jobs).
- (Optional) Check the box to remove unreferenced disks owned by this VM.
- Confirm your command.
Restore
To restore a backup:
- Select your device and choose the Backup submenu.
- Select the desired backup and click Restore.
- In the dialogue box that appears:
- Set the VM ID; use a non-existent number if restoring as a new machine rather than overwriting an existing one.
- Check Unique to avoid conflicts (e.g. MAC addresses) with the original VM; this allows both to run concurrently.
- If desired, check Start after restore to power on the restored VM immediately after restoration.
- Adjust configuration settings for the restored VM if needed.
In the restore menu, buttons provide information related to backed-up VM configurations, allow editing of backup notes, adjusting retention settings, and protecting backups from accidental deletion.
Setting up a Network backup endpoint
To set up a network endpoint, first share a folder on your device (computer, server, NAS). Instructions for sharing folders vary depending on your operating system and are not covered here; however, you may refer to external sources for guidance such as https://opensource.com/article/21/4/share-files-linux-windows.
To connect with a network share, you need:
- The share protocol (e.g., SMB/CIFS for Windows/Linux)
- The IP address or DNS of your machine
- Credentials for read/write access
- Choose Datacenter → Storage → <protocol>.
- In the dialogue box that appears, provide a reference name for your share.
- Enter your server’s IP address and credentials.
- Once validated, available shares populate in the Share dropdown list; select your share.
- Choose which nodes you want to back up and enable this share (default).
- You may also use this share for storing other content beyond backups; ensure that you select VZDump backup file for this HowTo.
- If applicable, choose your Domain and optionally specify a subdirectory rather than using root (e.g., if the same share is accessed by different Proxmox servers, each would have its own directory).
Network backups allow you to define Backup Retentions, similar to those previously mentioned; however, these apply across entire storage rather than specific jobs and are intended for managing network storage effectively.
While both methods may be deployed together in certain scenarios, unless there’s a specific need, avoid overlapping retentions as they could lead to complex diagnostic situations if issues arise within your backup strategy.
Once defined, the backup process is identical to what has been described under Defining the Backup Job.
Backup Schedule
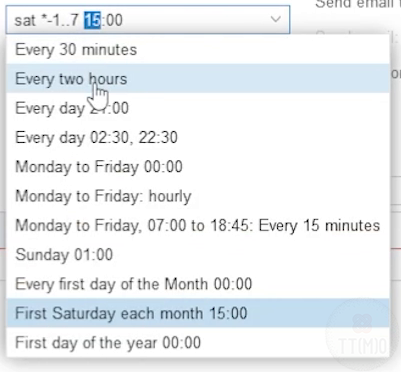
Proxmox comes with a template of schedules you can choose from, but you can create your own schedule.

For detailed instructions on defining schedules refer to https://pve.proxmox.com/pve-docs/pve-admin-guide.html#chapter_calendar_events. The format is: [WEEKDAY] [[YEARS-]MONTHS-DAYS]] [HOURS:MINUTES[:SECONDS]]. For example: scheduling backups on the first Saturday of every month at 3 am would look like:
| WEEKDAY | YEARS- | MONTHS- | DAYS | HOURS: | MINUTES | :SECONDS |
|---|---|---|---|---|---|---|
| sat | *- | 1..7 | 3: | 00 |
Conclusion
Thank you for following along with the Proxmox-NUT Homelab series. Your feedback helps shape future content, so please share any topics you’d like to see covered in the comments below. If you found this guide helpful, consider supporting it by sharing with fellow homelab enthusiasts and subscribing for more tutorials.
Links
Proxmox Schedule Format (25.1): https://pve.proxmox.com/pve-docs/pve-admin-guide.html#_calendar_events
Proxmox Backup Modes: https://pve.proxmox.com/pve-docs/pve-admin-guide.html#_backup_modes


Comments
Post a Comment