HOWTO Generate password protected OpenVPN client configuration using EasyRSA.
Latch on article
This piece latches on to an earlier article titled HOWTO setup OpenVPN server and client configuration files using EasyRSA available from http://www.alanbonnici.com/2018/01/howto-setup-openvpn-server-and-client.html. Go to that post for information on how to setup the server environment and generate certificates that are required to establish an OpenVPN connection.What’s New
This article covers the following topics:- Portability of the EasyRSA environments;
- Creating additional clients related to the same server;
- Creating a password protected client.
Portability of the EasyRSA environments
All EasyRSA script commands operate within the EasyRSA folder and pki subfolder. No settings are written in the registry or in some area of your computer out of the EasyRSA directory. Also all EasyRSA script commands are relative to this folder. This makes the EasyRSA environment self-contained and portable.For example, the EasyRSA server environment used in this article originated on a different computer. It was stored in a completely different directory and on a different drive.
Creating additional clients related to the same server;
The relation of client to server is many is-to one. You normally have multiple clients connecting to one server. There is nothing to stop a person from using the same client configuration on different computers but giving different clients their own unique certificate/configuration is good practice because it allows you to monitor activity. Having unique client configurations allows you to revoke the access of a particular client without impacting others.The EasyRSA server must sign each client request. This means that the generated EasyRSA server files must be retained in order to be able to sign future clients. The generated client files are also necessary if a particular client needs to be revoked.
I find that password-archiving the entire EasyRSA server folder structure when not in use is the best way to retain the server. It requires a mere 600 Kb of disk space.
Creating a password protected client.
The previous article on this topic created a client config file that was not password protected. The client configuration file generated here will ask for a password before OpenVPN attempts to tunnel through. This additional layer of security ensures that if someone manages to get hold of the ovpn config file (e.g. shared computer) they still would not be able to establish a connection to the server without the client’s private key password.The tutorial explains how to achieve this.
On The Client
Extract the downloaded EasyRSA archive to a location in which the client files will be generated. In this tutorial this folder will be called EasyRSA-client2.From within Windows File explorer go to the EasyRSA-client2 and double click on EasyRSA-start.bat. This will open the EasyRSA 3 Shell for Windows. Initialise the environment and setup the folder structure for the client PKI.
./easyrsa init-pki
The command below will generate the client’s private key and it’s Certificate Signing Request (CSR). The client in this tutorial is called Client2. The script will prompt for a password related to the client’s private that is used by OpenVPN when attempting to connect using the configuration file.
./easyrsa gen-req Client2
(Use nopass argument to skip the password prompt section – see first article).
The typed in password will not echo. The location of private key and CSR are generated at the end of the script. The private key will used in the client’s config file while the CSR will be signed by the server.
On the server: Processing the client CSR
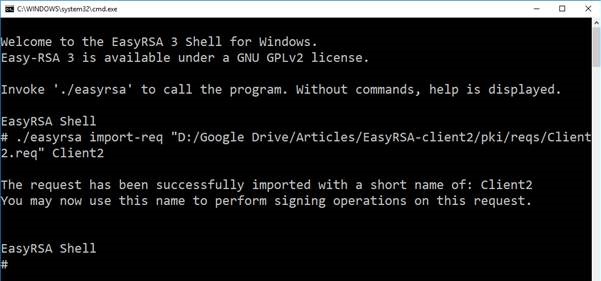
From Windows File explorer open the EasyRSA-server directory and double click on EasyRSA-start.bat. Since the server environment already exists (it was created in the first article) it will not be initialised. This ensures that the process adds new clients to previously defined ones.The command below imports the client’s CSR.
./easyrsa import-req “D:/Google Drive/Articles/EasyRSA-client2/pki/reqs/Client2.req” Client2
Once imported, the CSR needs to be signed by the server. You need to confirm that you want to sign the client certificate by typing in yes.
./easyrsa sign-req client Client2
A file called \pki\issued\Client2.crt will be generated on the server. Part of this file will be incorporated into the client config.
The client and server EasyRSA windows may be closed by typing Exit.
The client configuration file will need to be assembled. Instructions on how to do that are documented in the prior article.
The differences between this configuration file (client2.ovpn) and other clients is that the client related keys that are specific to each client. In this example since the client’s private key is encrypted the
The config file is listed at the end of this article.
Using this configuration within OpenVPN
When one attempts to connect using this config file the password associated with the client’s private key is requested.Client Configuration File (client2.ovpn)
  ##############################################

  # Sample client-side OpenVPN 2.0 config file #

  # for connecting to multi-client server.      #

  #                                             #

  # This configuration can be used by multiple #

  # clients, however each client should have    #

  # its own cert and key files.                 #

  #                                             #

  # On Windows, you might want to rename this   #

  # file so it has a .ovpn extension            #

  ##############################################


  # Specify that we are a client and that we

  # will be pulling certain config file directives

  # from the server.

  client


  # Use the same setting as you are using on

  # the server.

  # On most systems, the VPN will not function

  # unless you partially or fully disable

  # the firewall for the TUN/TAP interface.

  ;dev tap

  dev tun


  # Windows needs the TAP-Win32 adapter name

  # from the Network Connections panel

  # if you have more than one.  On XP SP2,

  # you may need to disable the firewall

  # for the TAP adapter.

  ;dev-node MyTap


  # Are we connecting to a TCP or

  # UDP server?  Use the same setting as

  # on the server.

  ;proto tcp

  proto udp


  # The hostname/IP and port of the server.

  # You can have multiple remote entries

  # to load balance between the servers.

  remote aaa.bbb.ccc.ddd 1175


  # Choose a random host from the remote

  # list for load-balancing.  Otherwise

  # try hosts in the order specified.

  ;remote-random


  # Keep trying indefinitely to resolve the

  # host name of the OpenVPN server.  Very  useful

  # on machines which are not permanently connected

  # to the internet such as laptops.

  resolv-retry infinite


  # Most clients don't need to bind to

  # a specific local port number.

  nobind


  # Downgrade privileges after initialization (non-Windows only)

  ;user nobody

  ;group nobody


  # Try to preserve some state across restarts.

  persist-key

  persist-tun


  # If you are connecting through an

  # HTTP proxy to reach the actual OpenVPN

  # server, put the proxy server/IP and

  # port number here.  See the man page

  # if your proxy server requires

  # authentication.

  ;http-proxy-retry # retry on connection failures

  ;http-proxy [proxy server] [proxy port #]


  # Wireless networks often produce a lot

  # of duplicate packets.  Set this flag

  # to silence duplicate packet warnings.

  ;mute-replay-warnings


  # SSL/TLS parms.

  # See the server config file for more

  # description.  It's best to use

  # a separate .crt/.key file pair

  # for each client.  A single ca

  # file can be used for all clients.

  ;ca ca.crt

  ;cert client.crt

  ;key client.key


  # Verify server certificate by checking that the

  # certicate has the correct key usage set.

  # This is an important precaution to protect against

  # a potential attack discussed here:

  #  http://openvpn.net/howto.html#mitm

  #

  # To use this feature, you will need to generate

  # your server certificates with the keyUsage set to

  #   digitalSignature, keyEncipherment

  # and the extendedKeyUsage to

  #   serverAuth

  # EasyRSA can do this for you.

  remote-cert-tls server


  # If a tls-auth key is used on the server

  # then every client must also have the key.

  #tls-auth ta.key 1

  key-direction 1


  # Select a cryptographic cipher.

  # If the cipher option is used on the server

  # then you must also specify it here.

  # Note that v2.4 client/server will automatically

  # negotiate AES-256-GCM in TLS mode.

  # See also the ncp-cipher option in the manpage

  cipher AES-256-CBC


  # Enable compression on the VPN link.

  # Don't enable this unless it is also

  # enabled in the server config file.

  #comp-lzo


  # Set log file verbosity.

  verb 3


  # Silence repeating messages

  ;mute 20


  <ca>

  -----BEGIN CERTIFICATE-----

  MIIDNTCCAh2gAwIBAgIJAK55XeHWQZ7mMA0GCSqGSIb3DQEBCwUAMBYxFDASBgNV

  BAMMC0Vhc3ktUlNBIENBMB4XDTE4MDExOTEzMzgwNVoXDTI4MDExNzEzMzgwNVow


  << cropped >>


  1dJk/vQHQE5sXoFKawskjhgpc9yHWOCSOtIU86daBXeECCVDwvvDC4ZsxTS+kezm

  EjKjt6DbTglu

  -----END CERTIFICATE-----

  </ca>


  <cert>

  -----BEGIN CERTIFICATE-----

  MIIDSjCCAjKgAwIBAgIQH6opQqoq+FAE+Tc5pDNNGTANBgkqhkiG9w0BAQsFADAW

  MRQwEgYDVQQDDAtFYXN5LVJTQSBDQTAeFw0xODAyMDcxMTQyMTNaFw0yODAyMDUx

  <<  cropped >>


  3ioUe4oMPiXWAMQWfqZ+OWOSGTlWD3oLJtcrMmYpw8c0G5HeGJ0C0fOX7XRFtoT6

  miUDdXa6SgQ+J6LHLVdL0Sknp3KDMI0f3472jZwy

  -----END CERTIFICATE-----

  </cert>


  <key>

  -----BEGIN ENCRYPTED PRIVATE KEY-----

  MIIFHDBOBgkqhkiG9w0BBQ0wQTApBgkqhkiG9w0BBQwwHAQIjlP8+vsDQqMCAggA

  MAwGCCqGSIb3DQIJBQAwFAYIKoZIhvcNAwcECBjFnHkAOhWOBIIEyOBVz6nykQuN

  <<  cropped >>


  16bPa3Zo0gSp1ZFFpzPOz/vklcxvwl5VR0mNHcxqBfa31EEmXoY848hWkQ+js3n1

  oqj8YHXKkUlRm/X6R+0Z6A==

  -----END ENCRYPTED PRIVATE KEY-----

  </key>


  <tls-auth>

  -----BEGIN OpenVPN Static key V1-----

  ab02f38877b948fa44ecb789a0090279

  7f9d17b84ee4024cbd7521569a130aec


  << cropped >>


  fadbf862c59b22796efe6074b2a8ad28

  5086c909f72fce1f3a27ee4ebc39bdb4

  -----END OpenVPN Static key V1-----

  </tls-auth>


Comments
Post a Comment